
MacBook Neo isn’t the only recent Apple device with a mechanical trackpad.
Apple’s original Magic Keyboard for iPad Pro, announced at the peak of COVID and available for purchase in April 2020, was their first trackpad for the iPad, and it was an all mechanical setup similar to the MacBook Neo.
iFixit tears it down and describes its functionality, with a nice little animation showing how it works:
What looks like multiple buttons in the X-ray is actually just one button and a simple, elegant lever system. The single button is at the center of the trackpad, where the mechanism is rigid. When you apply pressure near the center, whether top, middle, or bottom-center, you are directly pressing the button. Press near the top, bottom, or one of the corners, however, and the lever system comes into play, forcing the contact plate in the center upward to make a click happen. You can see it happen in this animation below. Note how the lever mechanism covers not only the diagonal corner areas, but the perimeter of the trackpad, too.
I’ve been using mine for years, and it still holds up really well with no signs of internal wear.
Apple releases new iPad Air with M4, and flexes more RAM for the same price.
Apple today announced the new iPad Air featuring M4 and more memory, giving users a big jump in performance at the same starting price. With a faster CPU and GPU, iPad Air boosts tasks like editing and gaming, and is a powerful device for AI with a faster Neural Engine, higher memory bandwidth, and 50 percent more unified system memory than the previous generation. With M4, iPad Air is up to 30 percent faster than iPad Air with M3,and up to 2.3x faster than iPad Air with M1. The new iPad Air also features the latest in Apple silicon connectivity chips, N1 and C1X, delivering fast wireless and cellular connections — and support for Wi-Fi 7 — that empower users to work and be creative anywhere. Available in two sizes and four gorgeous finishes that users love, the 11-inch iPad Air is super portable, and the 13-inch model provides an even larger display for those who want more space to multitask. With game-changing iPadOS 26 capabilities, advanced cameras, all-day battery life, a powerful app ecosystem, and support for accessories like Apple Pencil Pro and Magic Keyboard, iPad Air delivers a remarkable and versatile experience for anyone who wants to do more on iPad, from students and creators, to business users and gamers. […]
With the same starting price of just $599 for the 11-inch model and $799 for the 13-inch model, the new iPad Air is an incredible value. And for education, the 11-inch iPad Air starts at $549, and the 13-inch model starts at $749. Customers can pre-order iPad Air starting Wednesday, March 4, with availability beginning Wednesday, March 11.
Essentially just a spec bump, but the increase in RAM from 8GB to 12GB is notable. It’s funny how Apple never used to disclose RAM in their iPads and iPhones for years, and now we have them advertising it in the second sentence of their press release. 50% more RAM for the same price with today’s RAM prices? I would tout it too.
When compared to the previous two iPad Air devices, the M4 chip and RAM are the main upgrades.
Why isn’t this electrical circuit disabled on the iPad’s Magic Keyboard?
Apple’s website says (in small font):
The USB-C port on Magic Keyboard provides power, but it doesn't transmit data. This means you can't use this port with an input device such as a USB-C mouse. Never connect one end of a USB-C cable to the USB-C port on your iPad and the other end to the USB-C port on your Magic Keyboard.
Naturally, the moment I read this, I had to try it. 📓
Apple’s website says (in small font):
The USB-C port on Magic Keyboard provides power, but it doesn't transmit data. This means you can't use this port with an input device such as a USB-C mouse. Never connect one end of a USB-C cable to the USB-C port on your iPad and the other end to the USB-C port on your Magic Keyboard.
Naturally, the moment I read this, I had to try it. My battery did jump up from 44% to 45%, but it was an internal battery cycling error since the keyboard itself doesn’t have a battery. The iPad did start to heat up a little, but I’m surprised this function isn’t disabled. It really does give normal people the impression that the keyboard can charge your device, only to drain it faster than usual.

No, not infinite battery life. Notice the charging logo.
The Fitness app on iPad is a shell of what it could really be.
The iPad’s Fitness app is equal to the Fitness+ tab on the iPhone’s Fitness app. You don’t have tabs for Summary, Workout, or Sharing. This wasn’t a big deal until Apple added the ability to start workouts directly from the iPhone in iOS 26, whether you wear AirPods Pro 3 or Apple Watch. Now that AirPods Pro 3 can track your heart rate and works with countless workout types, it only makes sense for the Fitness app to be the same across all platforms and let you use an iPad to start a workout with metrics tracked on AirPods Pro 3. This would be perfect for people who like to watch videos on their iPad while running, allowing them to see their metrics in a dual-window setup, unlike this unoptimized dual-device setup.
Is Apple gatekeeping the iPad as a Fitness+ only device and limiting its functionality on purpose? Personally, I don’t think so. I’m expecting the app to be updated to be equal to the iPhone app and be more cohesive.
Apple Watch needs to have Continuity with iPad, but iPadOS is holding it back.
I love running on my treadmill and watching videos on my iPad, and that setup is perfect to project my Apple Watch metrics onto the iPad. It makes perfect sense, and would allow me to be more intentional with my running instead of repeatedly looking at my watch.
This feature already exists on the iPhone when I noticed my biking workouts project real-time metrics onto the Lock Screen and the Fitness app. Gym equipment also connects with Apple Watch, giving you more accurate information.
There is a general lack of compatibility (or Continuity per Apple lingo), between iPad and Apple Watch, even at this turning point where all of Apple’s platforms have now unified their naming scheme. Apple Watch is already intimately linked to the iPhone, and provides crucially convenient features for Mac users such as Apple Pay and Auto Unlock with Apple Watch. I use both of these Mac features on my 12-year-old, 2013 MacBook Pro, and it still works flawlessly.
The iPad doesn’t have a true clamshell mode, so it would need to be updated before Auto Unlock with Apple Watch and Apple Pay could be a feature. Hopefully we can see an update in iPadOS 27 for more Continuity features starting with these two, and yes, projecting workout metrics to the iPad screen.
Dual front cameras on the next generation iPad Pro might unlock new features.
Mark Gurman via his Power On newsletter:
When Apple rolled out the M4 iPad Pro in May 2024, it made the device thinner and (finally) moved the FaceTime camera from the portrait orientation to landscape. This was a nice change for those, like me, who live on landscape mode and rarely ever move into portrait orientation. The switch made it easier to use Face ID without issues and was a big improvement for both selfies and videoconferencing.
On the other hand, fans of portrait mode suddenly found it harder to unlock the device and use the front camera. So, what’s the solution? Pretty simple actually: Apple is apparently adding a second, portrait-side front-facing camera to the upcoming M5 iPad Pro, presumably so FaceTimers and selfie fans can use the device equally well in either orientation. This isn’t particularly revolutionary, but it’s a nice enhancement.
To make it really convenient to unlock in either orientation, you would ideally need another Face ID assembly with the extra camera in order to avoid getting that “Camera covered” message. Not sure if that will happen, but Apple might throw in some new features that Mark didn’t mention, such as a wider range for Center Stage, or even Desk View for iPad.
How to Temporarily Disable Face ID or Touch ID, and Require a Passcode to Unlock Your iPhone or iPad (2025 edition).
There’s never a bad time (and always a good time) to be reminded of this feature.
I copied the title straight from Gruber’s website, and it’s best just to read his description since I couldn’t put it any better. His almost 3-year-old article still holds up well, especially in today’s day and age:
The problem is this: if you use Face ID or Touch ID on your device (and you almost certainly should), what happens if law enforcement (or anyone else for that matter) takes your device and physically forces you to unlock it biometrically? There is some legal precedent supporting the notion that police can force you to do this, but can’t force you to provide them with a passcode or passphrase.
Here are two essential things everyone should know.
The first is hard-locking. When you hard-lock your iPhone or iPad, it enters a mode that requires the device passcode to unlock. With recent iPhones and iPads, you enter this mode the same way that you turn off the device: by pressing and holding the power button and either of the volume buttons for about two seconds.* You’ll know when you’ve pressed the buttons long enough because there’s haptic feedback.** This takes you to the screen where you see a slider to power down the device, and on iPhones, where you can initiate an Emergency SOS call or view the device owner’s Medical ID (if they have one). The important thing to note is that you don’t have to do anything on this screen to hard-lock your device — once you’ve gotten to this screen, the device is already hard-locked and will require the passcode to unlock. You can’t use Face ID or Touch ID again until the passcode has been entered. This is important because it means you can easily hard-lock your iPhone without even looking at it, or removing it from your pocket or purse. That you can do this surreptitiously is very much by design.
Just press and hold the buttons on both sides. Remember that. Try it now. Don’t just memorize it, internalize it, so that you’ll be able to do it without much thought while under duress, like if you’re confronted by a police officer. Remember to do this every time you’re separated from your phone, like when going through the magnetometer at any security checkpoint, especially airports. As soon as you see a metal detector ahead of you, you should think, “Hard-lock my iPhone”.
The second thing is to know your rights. Never ever hand your phone to a cop or anyone vaguely cop-like, like the rent-a-cops working for TSA. If they tell you that you must, refuse. They can and will lie to you about this. If you really need to hand it over, they’ll take it from you. And they won’t get anything from it, because you’ll have already hard-locked it, and you’ll know that you cannot be required to give them your passcode.
* You can also do the same thing by quickly pressing the side button alone five times. On older iPhones (iPhone 7 and earlier), rapidly pressing the side button five times will immediately initiate the SOS phone call to emergency services; on iPhone 8 and later it just takes you to the same lock screen as when you press and hold the side button along with a volume button. I find the press-and-hold method easier to remember. I think of it as squeezing my iPhone for a moment to protect its contents.
**This haptic feedback/confirmation only occurs if “Vibrate on Ring” is turned on in Settings → Sounds & Haptics. I feel like this haptic feedback should occur regardless of this setting.
The only thing that needs a minor update is his second footnote, which has changed with iOS updates. Under Settings > Sounds & Haptics > Haptics, you now have four different options:
Always Play
Play in Silent Mode
Don’t Play in Silent Mode
Never Play
Keep your Haptics on “Always Play” so you can always feel the confirmation for hard-locking your device even though it is out of sight, regardless of Silent Mode.
The last thing you want is to second guess yourself and think, “is my iPhone actually hard-locked or not?”
For the iPad, there is no Haptics option, so holding the power button and either volume button (or both volume buttons) for 2 seconds is enough.
iOS 18 does not give you the freedom to move widgets wherever you want.
18 years.
We have been waiting 18 years to move our apps wherever we want to in iOS, and now we have complete app freedom.
After all, it took a new generation of engineers to make this happen.
Developers had to be born first, in order to handle the complexities of moving the icons from the top, to the bottom, per Craig Federighi himself.
Truly a remarkable feat.
Unfortunately, we may need to wait for another batch of engineers to be born to fix the widget situation…📓
18 years.
We have been waiting 18 years to move our apps wherever we want to in iOS, and now we have complete app freedom.
After all, it took a new generation of engineers to make this happen.
Developers had to be born first, in order to handle the complexities of moving the icons from the top, to the bottom, per Craig Federighi himself.
Truly a remarkable feat.
Unfortunately, we may need to wait for another batch of engineers to be born to fix the widget situation.
All jokes aside, Apple states we can place widgets where we want them, but that is not the case.
Apple’s claim:
Place your apps and widgets right where you want them. Arrange them along the bottom for quicker reach, or off to the side to frame a favorite wallpaper. Or give each page of your Home Screen a unique layout that's most helpful for you.
When it comes to apps, we do have complete freedom. With widgets, we cannot place them where we want them.
If you use the large widget, you have 2 spots to place them, but you cannot center the widget:

If you are using a medium-sized widget, you have 3 spots to place them, but you cannot place them in rows 2-3 and 4-5:

The smallest widget size, perhaps the most used by people to customize their home screens, has even more limitations. There are 6 layouts that you can use, but there are 9 layouts that you cannot use.

Apple’s walled garden gives you these six choices…

but not these nine choices.
This is the definition of freedom, within Apple’s walled garden.
The situation is more optimistic on iPadOS 18. You still have similar restrictions with the large and medium sized widgets, but for small widgets, you can place them anywhere. The extra space between icons allows for that luxury. It’s actually quite satisfying turning your apps into small widgets, and nothing moves.

I turned whatever apps I could into small widgets, and nothing shifted position.

Also works in portrait mode.
In order to fix this issue, we need the birth of a new generation to rise.
A new generation, with the skill and capabilities to fix what was thought to be unfixable.
A new generation, filled with hope and ambition.
A new generation, to give us the freedom we deserve.
Springboard, here we come!
Passwords App on iPhone and Mac - one huge security difference.
I was reading about Microsoft’s AI based Recall feature, and I thought to myself, what if that feature was on the Mac? Would sensitive information be blurred out when screenshots were automatically being captured?
I was reading about Microsoft’s AI based Recall feature, and I thought to myself, what if that feature was on the Mac? Would sensitive information be blurred out when screenshots were automatically being captured?
The most sensitive app on your iPhone, iPad, or Mac is the Passwords app, and if it were to be “screenshotted,” it should blur the passwords.
On iOS and iPadOS, the Passwords app blurs all passwords when you take a screenshot. Even if you want to display the password in large type, the whole screenshot is a giant white blank screen, which is awesome. Even if the password field is obscured with dots (•••••••••••), taking a screenshot makes that whole field completely blank so you don’t even know how long the password is.
Here are 4 screenshots on iOS, showing the completely blank password field:

Now compare that to what you actually see when you are in the Passwords app on iOS (or iPadOS):

In general, iOS and iPadOS do a great job of obscuring your password when taking a screenshot in their app.
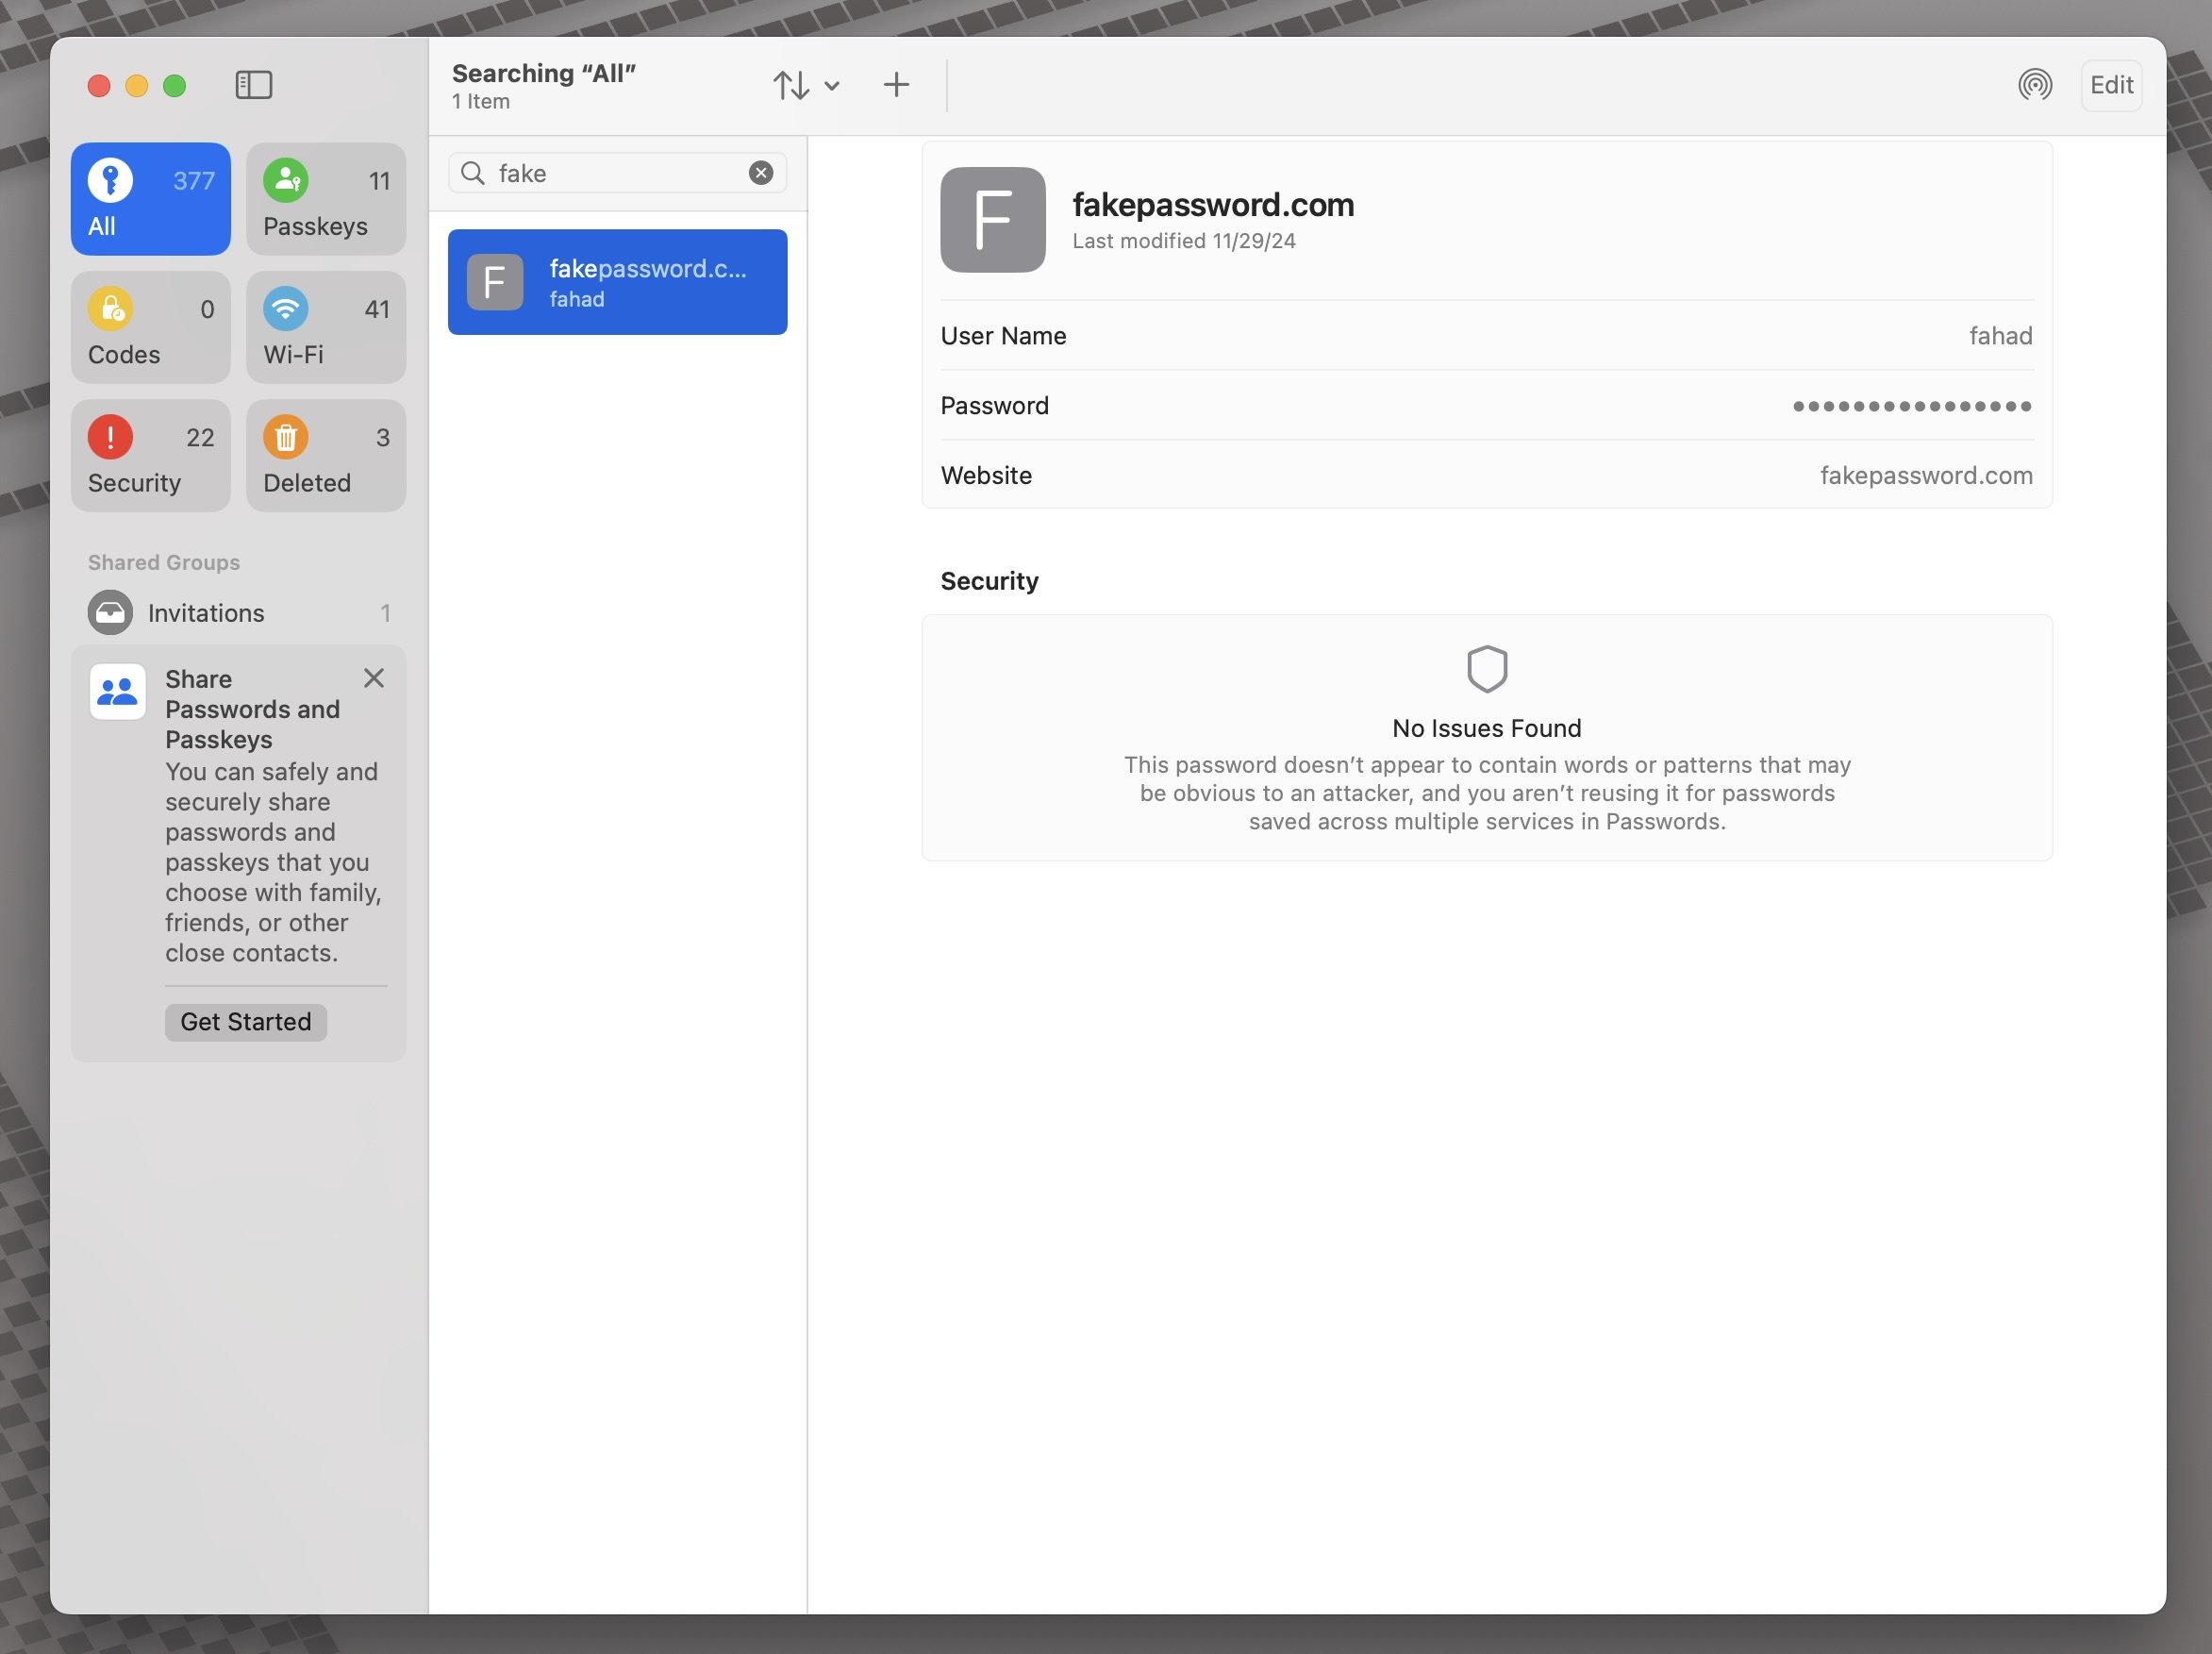
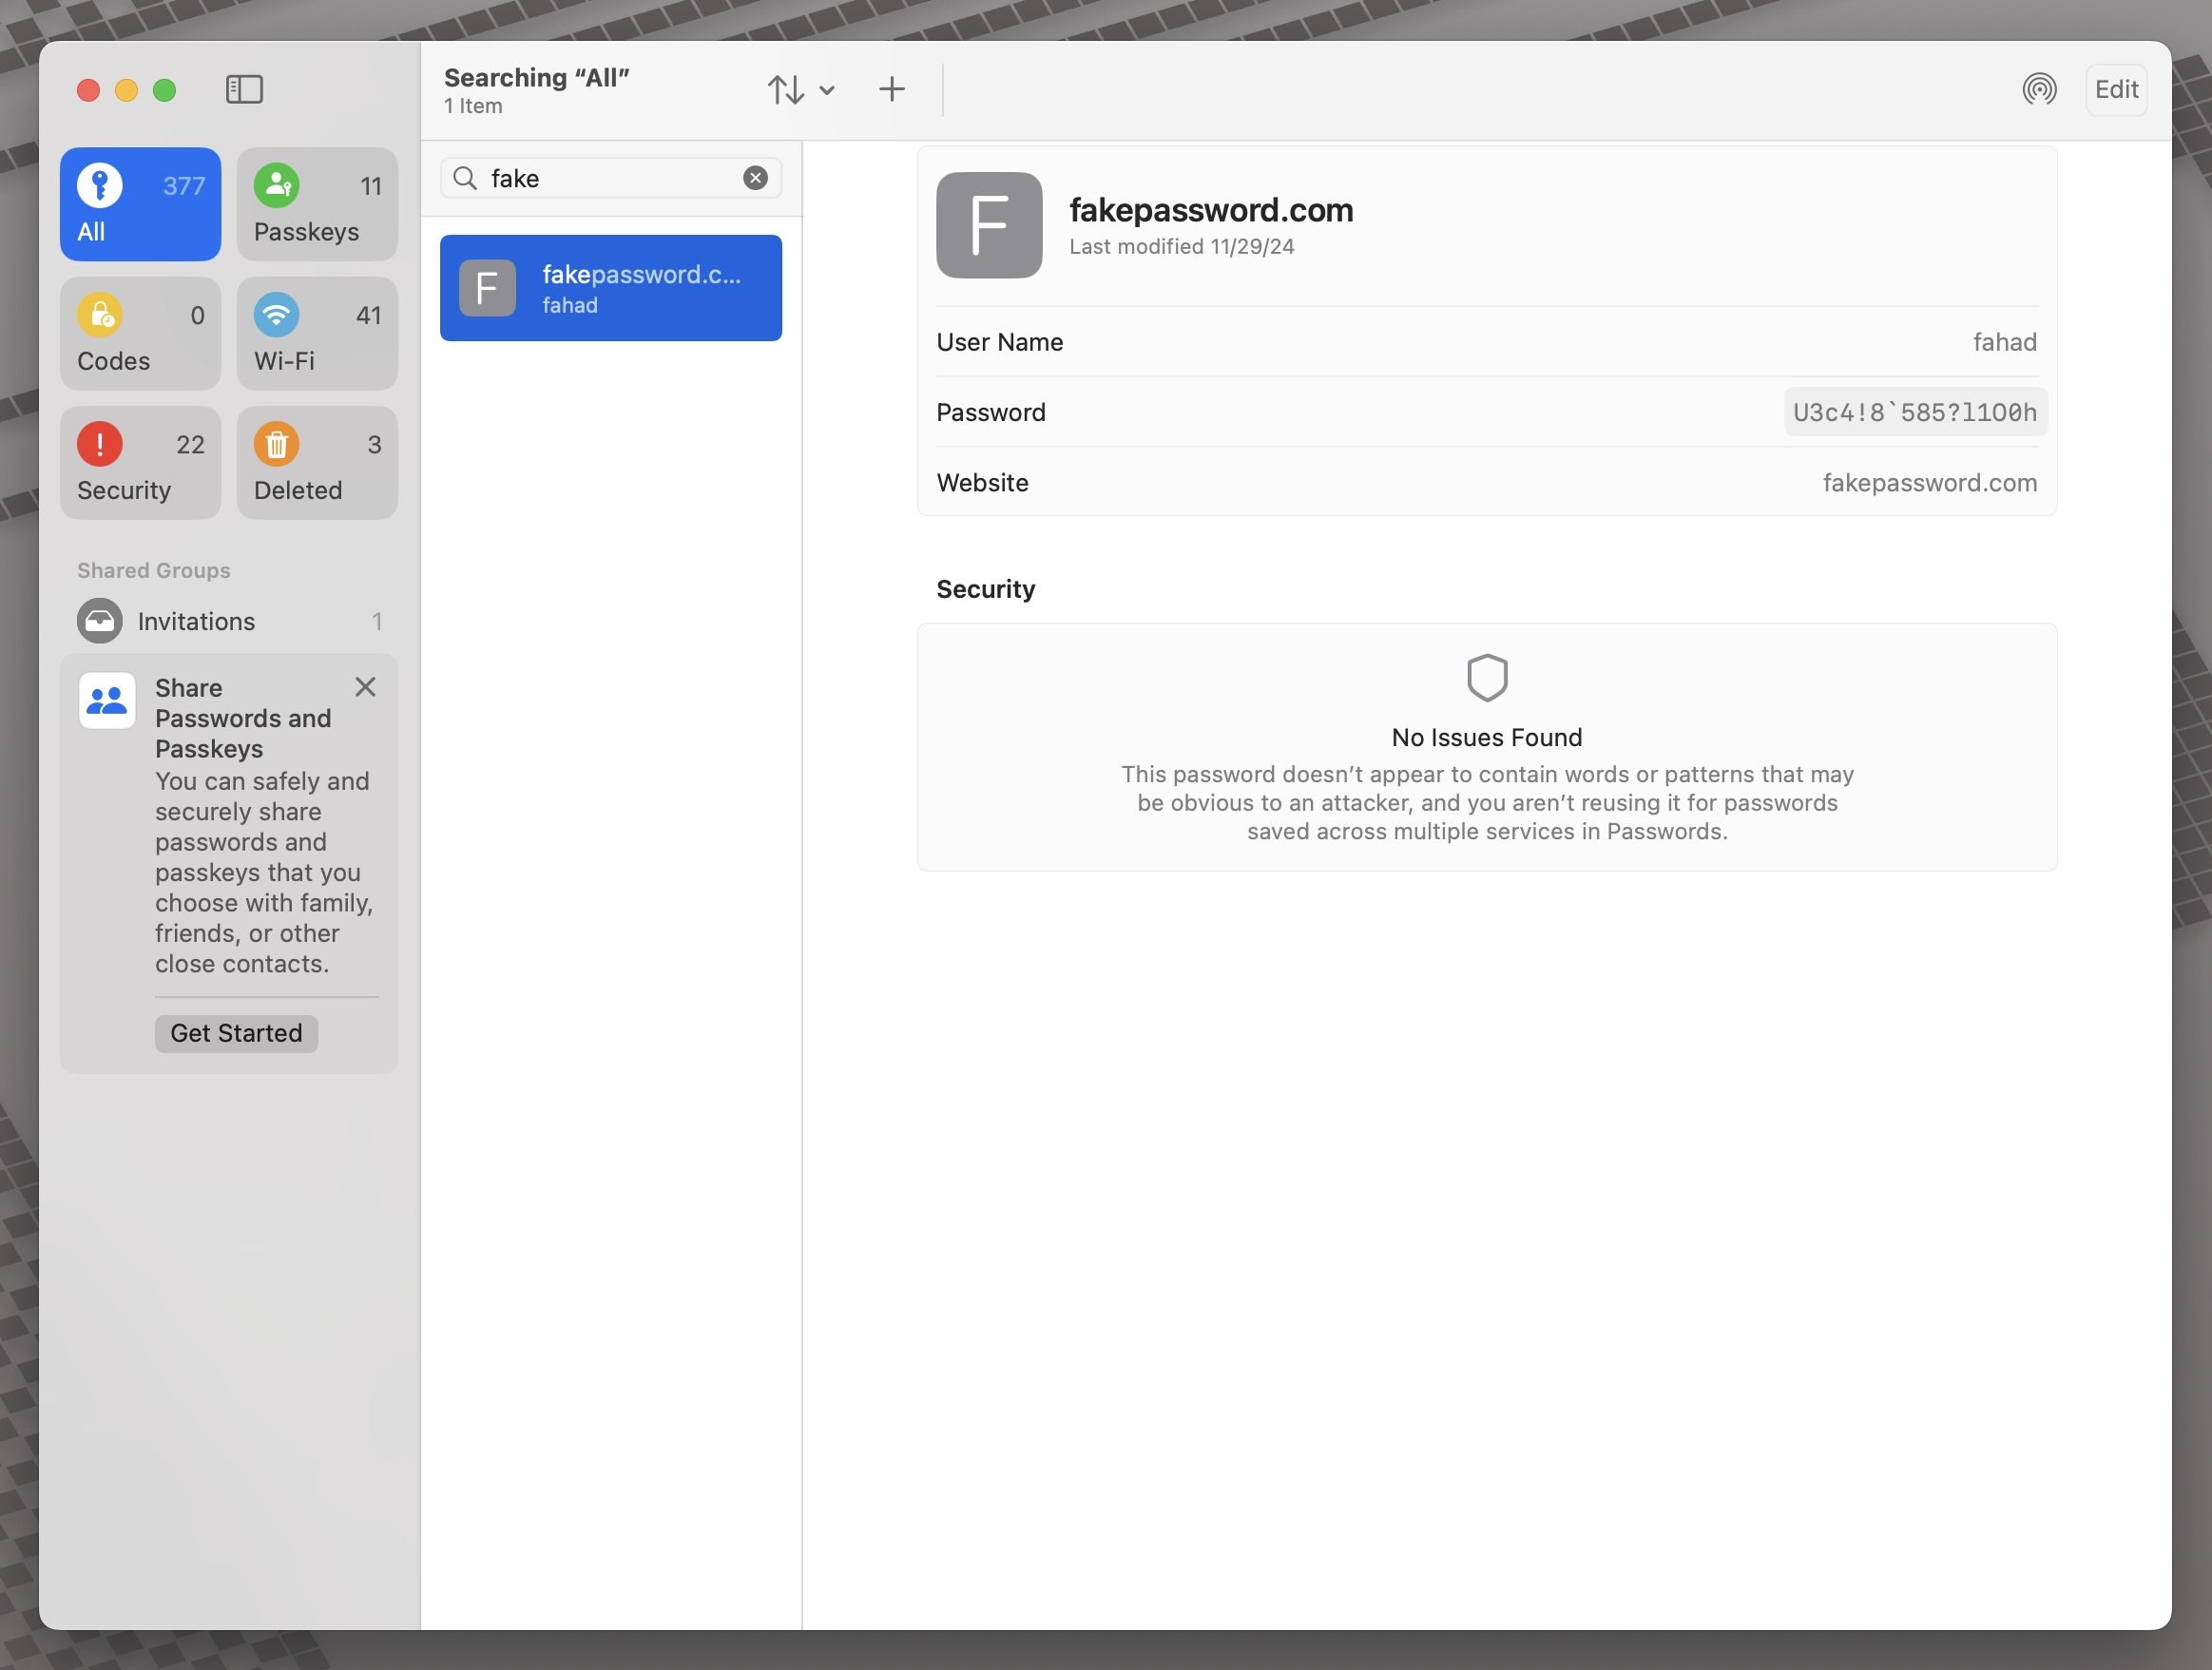
On macOS, that is not the case.
I opened the Passwords app and started taking screenshots, and it faithfully captures everything your eyes can see:
If your password is hidden with dots, you will see the dots.
If you hover over your password revealing itself and then you take a screenshot, you will see the password.
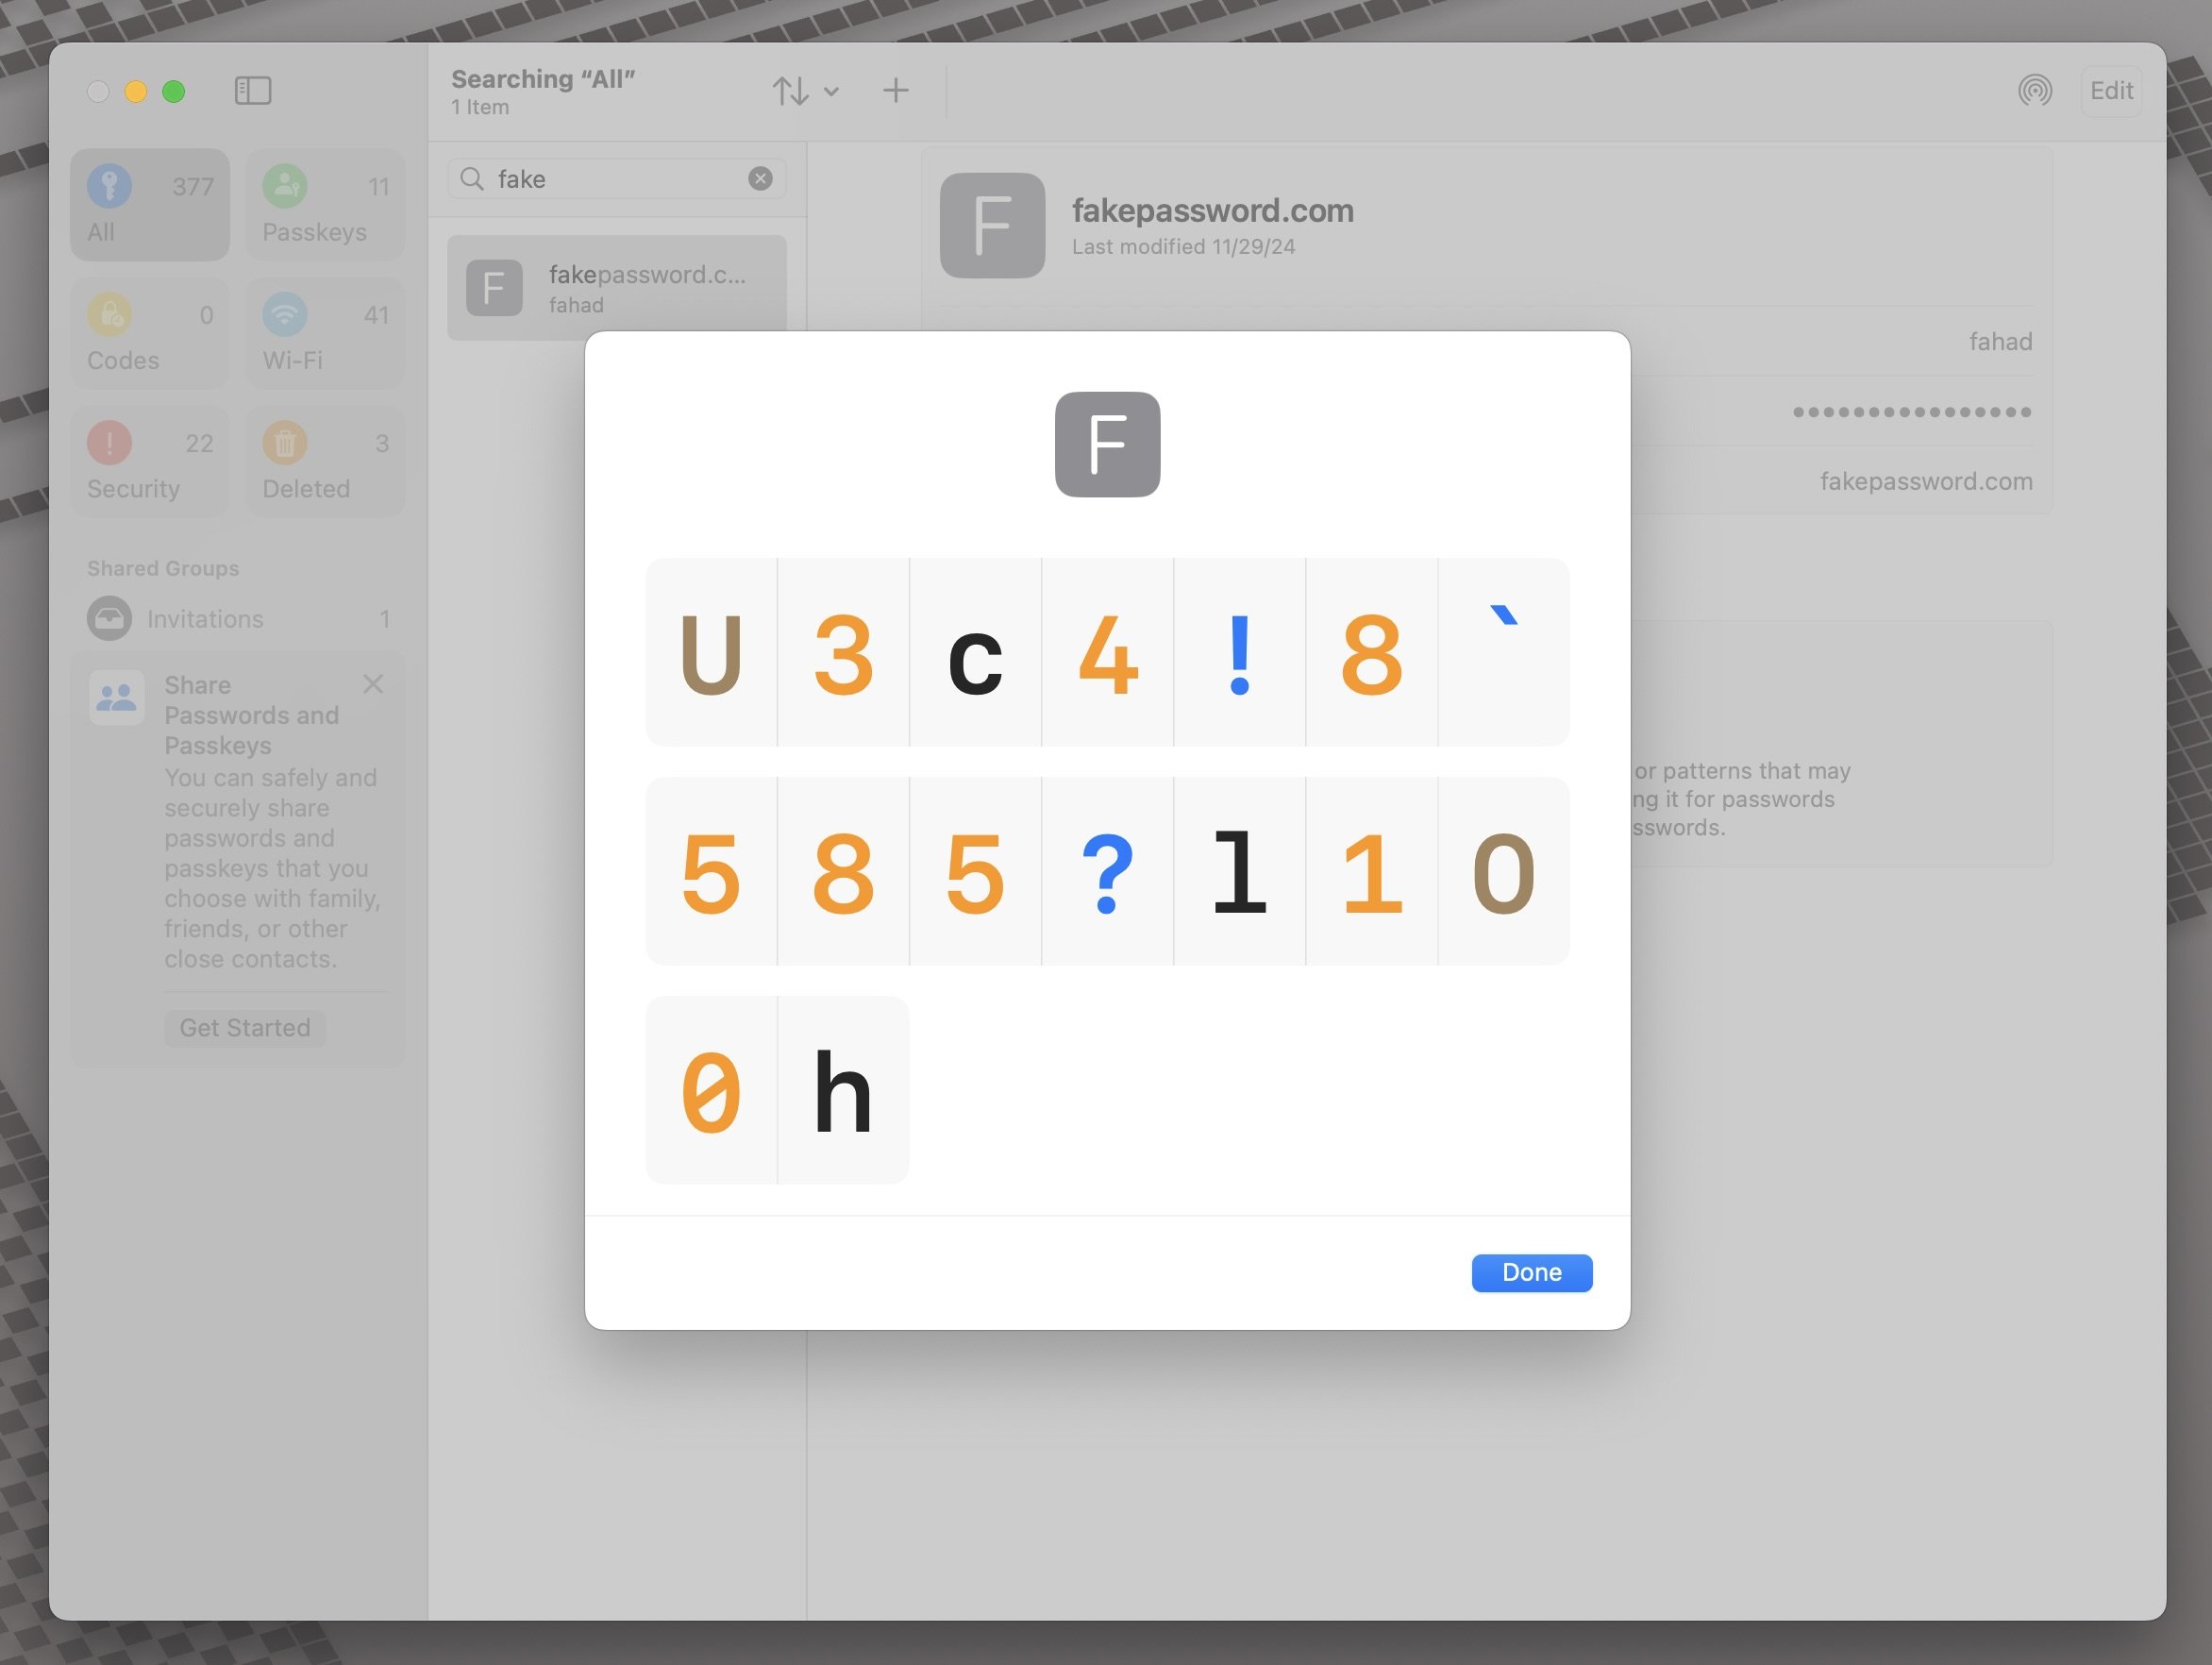
If you choose the option to display the password in large type and then take a screenshot, you will see the password.
This is the complete opposite of iOS and iPadOS, and something Apple should address.
This might not be a security risk, but it can be in certain scenarios:
You save your screenshots to the cloud by default, making your passwords exposed to other individuals who might share the same iCloud folders as you.
You have multiple monitors and your passwords app is on your secondary (or tertiary) monitor. Many people don’t know or forget that when you take a screenshot, all of your monitors are being captured.
You have a custom mouse that has hotkeys for screenshotting, and you accidentally capture screenshots without your knowledge.
If this Recall feature was on macOS today, would you even want to open your Passwords app, knowing that the computer is taking screenshots in the background and capturing your sensitive information?
How to reduce Motion Sickness while using your iPhone.
Great write-up by Ryan Christoffel at 9to5Mac. I’m not normally the passenger when in a vehicle, but when I am, I do get motion sickness and have to put my phone down.
I will have to try this one day, but I’m sure it will work just as advertised:
Vehicle Motion Cues is a new accessibility feature in iOS and iPadOS 18. You can activate it by opening Settings ⇾ Accessibility ⇾ Motion, or with a Control Center toggle.
When adding the Control Center toggle, you have to scroll all the way to the bottom under “Vision Accessibility,” to add the toggle. Here is what the toggle looks like in small and big form.
Apple’s markup is kind of a mess.
Apple’s markup tool is something that I use probably on a daily basis, but there are some inconsistencies that you should be aware of, especially if you are using it cross platform between iOS and macOS. Here are just some scenarios that I tried and discovered how confusing things can get.
Apple’s markup tool is something that I use probably on a daily basis, but there are some inconsistencies that you should be aware of, especially if you are using it cross platform between iOS and macOS. Here are just some scenarios that I tried and discovered how confusing things can get.
Let’s start with the Mac:
Markup for screenshots are permanent edits once you close out of the preview, whether you do the edit immediately after taking the screenshot by clicking on the small icon in the corner of the screen, or if you access it later from Finder.
Markup for a photo in the Photos app can always be edited and undone.
Markup for a pdf can always be edited and undone.
On the iPhone and iPad:
If you take a screenshot and edit right away by clicking the tiny screenshot, whatever markups you do that way will become a permanent “instance.” The only thing you can do after this point is revert back to the original image, or build upon the current markups you did. You cannot erase part of these markups.
For example, if you added a square and a circle to your markup, you can revert back to the original image with no markup, or you can build upon the square and circle. You cannot erase just the circle or just the square.
If you take a screenshot and flick it away, go to the photos app and then do the markup, you can edit, erase, and undo without any restrictions. Nothing is permanently engraved until you share the photo with the share card.
Markups for a pdf can always be edited and undone.
For cross platform talk:
Pdf files are pretty easily editable without much hassle on either platform. I have had no trouble when switching between the 3 platforms and was able to easily undo any changes seamlessly.
If you have iCloud photo library on, you can edit on an iPad and easily undo those edits on an iPhone, Mac, and vice versa. I was able to verify this on my iPhone and iPad, but since I do not have iCloud photo library enabled on my mac, I can’t confirm whether that works or not. My guess is that it does work.
The tip of the day is: if you are taking a screenshot of anything on iOS or iPad OS, swipe it away and access it from the photos app before you do any markups. This way you have more control in modifying your markups later on. For mac, markups for screenshots are permanent so be careful regardless of when you mark them up.